
Background
You may be starting out in PowerShell or well into your journey of learning PowerShell. But maybe now you’re wanting to learn a little more about how you can supercharge your PowerShell experience. This is where the PowerShell $profile comes into play.
The PowerShell $profile allows you to add commands or functions which will be accessible when you start your PowerShell session in a terminal.
Locating Your $profile
So first thing we’re going to want to do is locate the $profile, this will make is easier to edit your profile. You can do this by typing in the following command
get-item $profile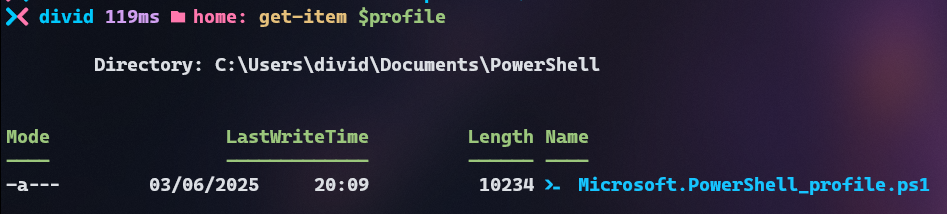
You can also quickly edit your $profile by editing directly from your editor of choice my examples will use NeoVim but can easily be used with Notepad or PowerShell_ISE.

What reasons might you want to update it
Editing the $profile is a fantastic way to improve not only your workflow but the look and feel of your environment. Customising and ensuring you have something that works for yourself. Editing your $profile is also a great way to get a better understanding of how you can interact with PowerShell.
What now!
Well you’ve opened the $profile and it’s looking a little bare, the question is what can you do with it? Personally I find it a great place to start to edit items such as setting alias. This is a great way just to make accessing tooling a little faster. As an example above I wrote “nvim $profile” to edit the $profile within NeoVim. Though typing nvim every time that I want to amend a document just is too many letters. So I set an alias in the $profile; which means that I can just type ‘n’ instead.

As you can see we can start things out pretty basic; but as developers, coders or even computer tinkerer’s, we can go a lot deeper creating items that are a lot more complex. Don’t get me wrong as with anything there is an overhead cost to adding items to your $profile. It can increase any startup time and edits might not always be the most useful. But hopefully you’ll be able to find the balance that will suit your needs.
Lets take a look at some of the other items I have in my profile, maybe you’ll find something of use here as well. Now I will preface this by pointing out – any code used is probably terrible PowerShell code and no doubt there might be better ways to perform some of these tasks. Maybe we can discuss some of that in the comments below.
Example 1 – Public IP

Maybe you want to find out what your public IP address is. It’s not something I use often but it’s not something you can just use ipconfig to obtain either.
function Get-PublicIP {
  ((Invoke-WebRequest -Uri http:\\www.ifconfig.com).Content).Split("Your IP is")[1].Split("<br>")[0]
}
Example 2 – Advent Of Code Folders
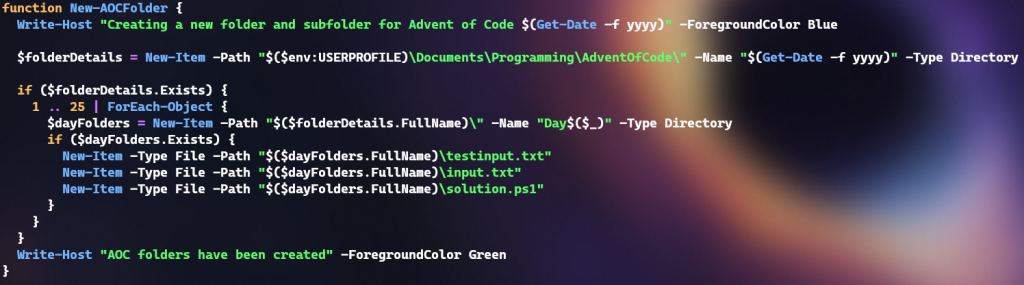
Now every year I like to (at least start) do (Advent Of Code)[http://adventofcode.com/]. If you’re unfamiliar this is 25 coding challenges which start at the beginning of December until the 25th. I may never reach the 25th day, but I at least can start a folder structure for the year in my profile keeping all my code in one place. Although it’s not up to date you can view some more of my terrible PowerShell code over at https://github.com/divideddarko/AdventOfCode
function New-AOCFolder {
  Write-Host "Creating a new folder and subfolder for Advent of Code $(Get-Date -f yyyy)" -ForegroundColor Blue

  $folderDetails = New-Item -Path "$($env:USERPROFILE)\Documents\Programming\AdventOfCode\" -Name "$(Get-Date -f yyyy)" -Type Directory

  if ($folderDetails.Exists) {
    1 .. 25 | ForEach-Object {
      $dayFolders = New-Item -Path "$($folderDetails.FullName)\" -Name "Day$($_)" -Type Directory
      if ($dayFolders.Exists) {
	New-Item -Type File -Path "$($dayFolders.FullName)\testinput.txt"
	New-Item -Type File -Path "$($dayFolders.FullName)\input.txt"
	New-Item -Type File -Path "$($dayFolders.FullName)\solution.ps1"
      }
    }
  }
  Write-Host "AOC folders have been created" -ForegroundColor Green
}
Example 3 – Get Colour
This one is a little more fun – using the list of colours that you could set for the foreground or background within the terminal. We can set a random colour this just makes some of the results stand out a little better.
Maybe if you like consistency this might not be the best choice but it livens up any output easily.
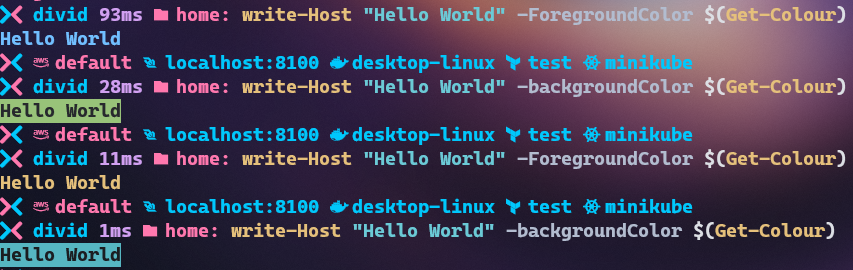
As we can see calling this function allows us to get a different result every time.
function Get-Colour {
  $colourList = @{
    1 = "DarkBlue"
    2 = "DarkGreen"
    3 = "DarkCyan"
    4 = "DarkRed"
    5 = "DarkMagenta"
    6 = "DarkYellow"
    7 = "Blue"
    8 = "Green"
    9 = "Cyan"
    10 = "Red"
    11 = "Magenta"
    12 = "Yellow"
  }

  $num = Get-Random -Maximum 12 -Minimum 1
  $colourValue = ($colourList.GetEnumerator() | Where-Object {
    $_.Key -eq $num}
  ).Value
  return $colourValue
}
Example 4 – Colour Word Search
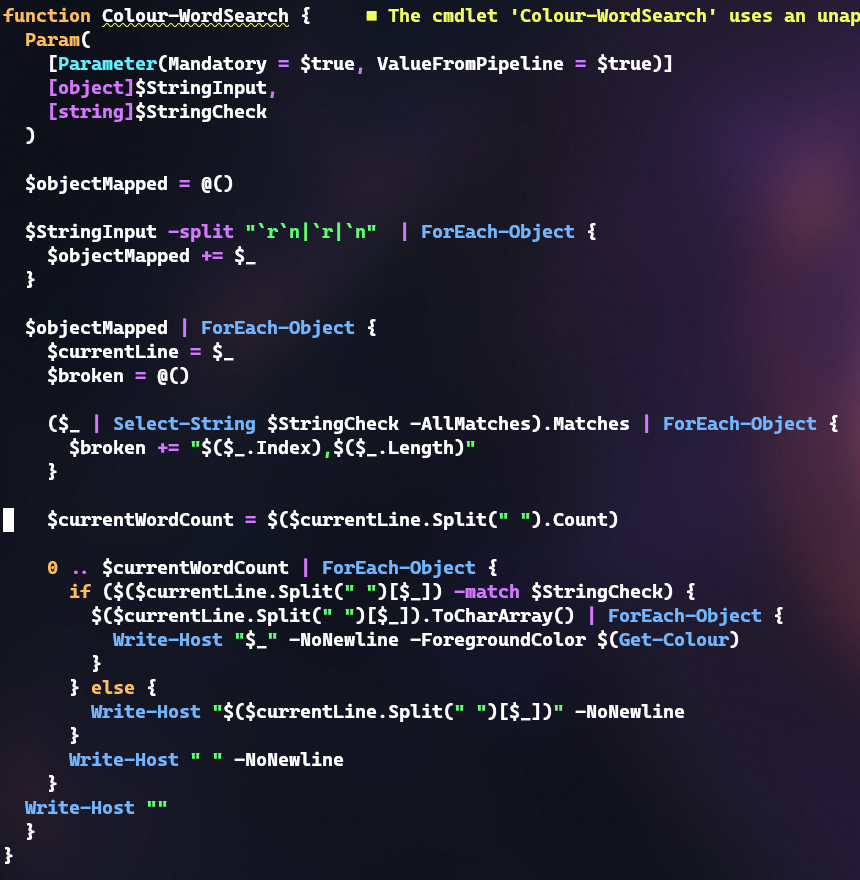
Extending from Get-Colour I wanted to find a way to highlight words easily. This came super helpful when I was trying to parse through large chunks of text that wasn’t easily formatted.
Although there are a lot of tweaks I could make, this early version allows me to give an input object and a word to search for in that object.
As it writes out the text to the screen if the word is found it will amend the colour. I find this very useful albeit a lot slower that just printing the text to screen. Again a trade off I’m willing to use for large outputs. Being colourful allows me to scan the text a lot easier to see what “pops”.

function Colour-WordSearch {
  Param(
    [Parameter(Mandatory = $true, ValueFromPipeline = $true)]
    [object]$StringInput,
    [string]$StringCheck
  )

  $objectMapped = @()

  $StringInput -split "`r`n|`r|`n"  | ForEach-Object {
    $objectMapped += $_
  }

  $objectMapped | ForEach-Object {
    $currentLine = $_
    $broken = @()

    ($_ | Select-String $StringCheck -AllMatches).Matches | ForEach-Object {
      $broken += "$($_.Index),$($_.Length)"
    }

    $currentWordCount = $($currentLine.Split(" ").Count)

    0 .. $currentWordCount | ForEach-Object {
      if ($($currentLine.Split(" ")[$_]) -match $StringCheck) {
	$($currentLine.Split(" ")[$_]).ToCharArray() | ForEach-Object {
	  Write-Host "$_" -NoNewline -ForegroundColor $(Get-Colour)
	}
      } else {
	Write-Host "$($currentLine.Split(" ")[$_])" -NoNewline
      }
      Write-Host " " -NoNewline
    }
  Write-Host ""
  }
}
Extras
This is just some of the ways in which I edit my PowerShell $profile – I’ve also got commands dedicated to starting docker, minikube and port-forwarding my deployed pods so that I can run instances of Jenkins, Gitea, ArgoCD and a few more without having to think about some of the finer details.
Some of the benefits of going through this process allowed me to explore investigate and understand a lot more for the inner workings of these applications as well as improve my workflow.
Some other toolings that might be worth a look at that I haven’t included above but come from other sources include
– Oh-my-posh
– PS-ReadLineOption
I will be looking at covering these at a later date, but they give you some of the cusomisation you might have seen in my pictures above.
Helpful
So you’ve edited your $profile, you’ve included some nice new touches and you’ve gone back to your PowerShell Terminal window to test them out. Shocker they’re not working – this could be down to a few things which hopefully we can cover below
Refresh
If you edit the $profile file your terminal window won’t have registered any changes so you’ll need to refresh your $profile in the window this can be done my typing the following
. $profileThis will refresh the $profile and your new commands should be available. Another helpful command that can be beneficial if you’re changing the $profile quite a lot is refreshenv
refreshenvThis will also refresh the terminal environment – hopefully clearing any issues.
Well with that covered let me know how you run your terminal below.